(Note: This is a postmortem for a project that I worked on over 4 years ago. I'm writing it because it provides context for further posts I want to write on the topic of dialogue systems.)
Yarn Spinner is a dialogue system originally developed by the team behind Night in the Woods, Secret Lab. They created it for their game and have been working on extending it as a tool for everyone to use ever since.
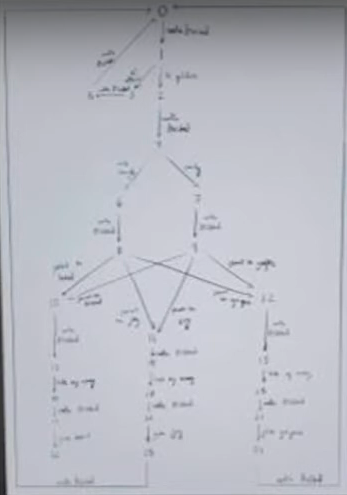
I had my first encounter with Yarn Spinner when I was working at Santa Clara University's (SCU) XR Lab on Lingua Vitae, a VR game that teaches people Latin. The game was presented at NarraScope 2020 and is currently still undergoing development by some of my previous colleagues. My task for this project was overhauling the dialogue system that was originally being used. As you can see, it was a bit of a monster:

This bad boy split every line of dialogue into its own ScriptableObject — we were using Unity, by the way — complete with info about the animations and sounds that needed to play, as well as any choices that had to be made or variables that needed to be evaluated.
While it was extremely meticulous with its information for each line, the problem with this system was how cumbersome it was to write content for. Writing any new dialogue segments required hiring a student worker (me) to translate a Google Doc into a bunch of ScriptableObjects and then manually connect each line of dialogue to its next line manually by dragging in the next line object as a reference in the inspector.
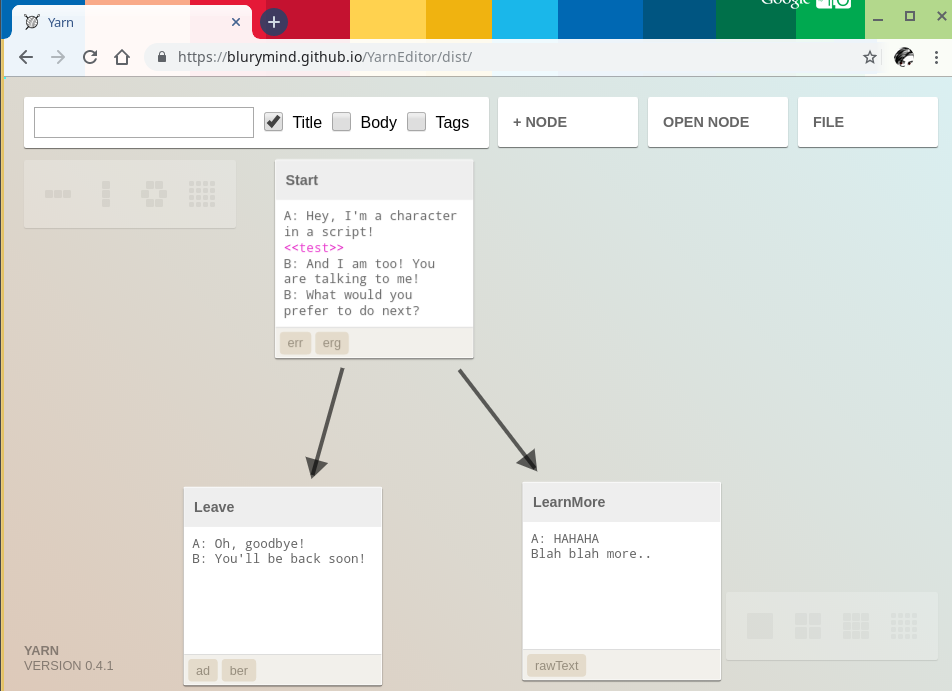
Since the project was still in its infancy at the time, I suggested switching to Yarn Spinner to make the project easier to write for. Yarn Spinner uses text files as its dialogue data and even came with a handy editor that looked something like this:

This editor made it very easy for us to get our saying and doing what we wanted them to, because it allowed us to call functions and work with variables from the dialogue. So whenever we wanted audio to play or an animation to run during dialogue, we could just call those functions.
Safe to say, Yarn Spinner was a godsend. It got our writers more motivated to write for the game, and with very minimal assistance from student workers, got the dialogue running perfectly.
Of course, I wouldn't be writing a blog post about it if there weren't any problems.
Rich Text Formatting
In the editor, a few buttons loomed above each line of dialogue I wrote. Most notably, the glam gang:  This got us really excited because it meant we got to format our text! Right off the bat, this was something we wanted to use to call attention to vocab words. The system even gave us access to assigning colors to words, which meant we could specify parts of speech using color, and then reserve bold, italics, and underlines for inflection and emphasis.
Unfortunately, Yarn's editor only let us insert this kind of rich text formatting using BBCode ([b]Hello[/b] evaluates to Hello) while Unity's rich text component, TextMesh Pro uses tags reminiscent of HTML (<b>Hello</b> evaluates to Hello). Not too bad, we just didn't use the formatting buttons and typed the correct style of formatting tags ourselves.
Yarn Spinner's Unity plugin also didn't come with TextMesh Pro integration, so I had to write a script that connected the two and got the typewriter effect working. Finally, we were able to get the tags in. Except there was an issue with color tags.
The Comment Conflation Conundrum
Yarn Spinner uses the # symbol to signify that the remainder of a line is a comment.
TextMesh Pro's documentation on the <color> tag says this:
Use hexadecimal values, as in
<color=#FFFFFF>or<color=#FFFFFFFF>if you also want to define the alpha value.
So that was a problem.
What boggled my mind at the time was how the Yarn Editor itself inserted #'s with the color picker formatting option. So it must've just not been implemented as a feature yet because it was conflicting with the way their language was compiled.
We had two choices:
- Be stuck with only 8 preset named colors to pick from.
- Find a way to fix this comment issue.
So I wrote a parser.
We decided that when we wrote our Yarn Spinner dialogue, we would omit the # from the text and then have the dialogue runner put them back in after Yarn finished compiling. At the time, I didn't know what a regex was so I, uh... did this instead:
public string YarnRTFToTMP(string line)
    {
        for(int i = 0; i < line.Length-8; i++)
        {
            // Search for any color tags that need a hashtag
            if (line.Substring(i,7) == "<color=" && line.Substring(i,8) != "<color=#")
            {
                line = line.Substring(0, i) + "<color=#" + line.Substring(i + 7);
            }
            // Search for any alpha tags that need a hashtag
            if (line.Substring(i, 7) == "<alpha=" && line.Substring(i, 8) != "<alpha=#")
            {
                line = line.Substring(0, i) + "<alpha=#" + line.Substring(i + 7);
            }
        }
        return line;
    }
I would not learn what a regex was for at least another year, so I was just happy this worked. But now that I had tags getting parsed, I thought to myself, what if we had
Custom Tags??
Since we were calling functions every line to play audio and animations, I thought, why not have those be tags that got parsed out. So I made a Custom Tag class and a tag parser that implemented a similar non-regex system as the one above, but the code was so unbearably horrible that I decided to leave it as an exercise for the reader.
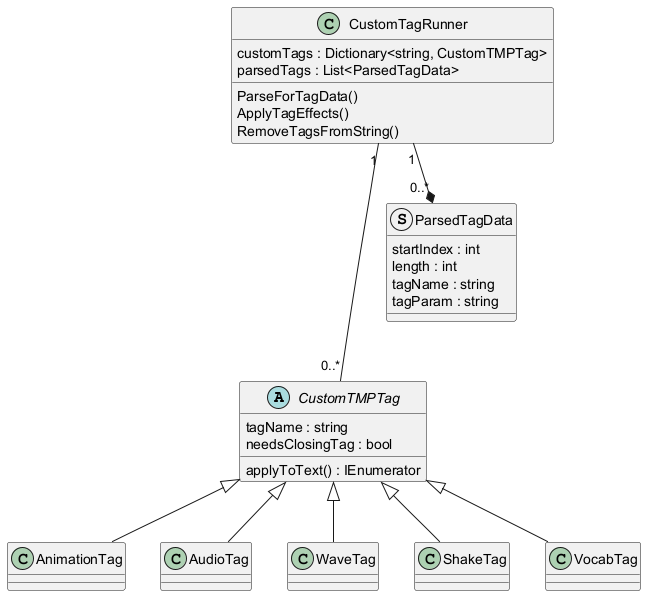
The general structure was like this:

The CustomTMPTag class was a ScriptableObject that contained the token the parser would look for along with whether it needed a closing tag. Its ApplyToText function would be defined by each custom tag implementation:
<animation>would play a specific character animation on that character at that point in the line.<audio>would play an audio clip at that point in the line.<wave>would make the text it enclosed wave by animating the TextMesh<shake>would make the text it enclosed shake by animating the TextMesh<vocab>would color the text it surrounded green and enclose it in a BoxCollider so the word could be interactable.
The CustomTagRunner took in a dictionary of the custom tag objects it needed to parse out and then produced a list of ParsedTagData which would be used in the ApplyTagEffects() function to run each tag's effects on the correct sections of the text. Finally, the RemoveTagsFromString() function created a tagless version of the string for the TextMesh component to display.
Here's what it looked like:

This was as far as I needed to go for Lingua Vitae. But it was only the beginning of my dialogue system saga.